Recently we needed to design and develop a custom blog post template for our Web Design & Development Conferences to Attend in 2020 article here on 1stWebDesigner. Rather than just stick with the same layout we use on all of our blog posts and simply creating a long list of links to the various conferences throughout the year, we wanted to give this particular post a different, more user-friendly layout, with each month of the year as its own section and a multi-column grid that would display up to three columns per row. Click on the link above to see what we came up with.
Because we had not used a custom blog post template like this before, we had to figure out how to make it happen, and, in doing so, realized this would be a great tip to share with our readers so that you too could implement this methodology should the need arise.
UNLIMITED DOWNLOADS: 500,000+ WordPress & Design Assets
Sign up for Envato Elements and get unlimited downloads starting at only $16.50 per month!

Why Would You Use A Custom Blog Post Template?
In our case, it made perfect sense to use a custom blog post template because we had hundreds of conferences to share and listing them out with just plain text and links would not only be boring visually, it would really be too long to browse through in that format. You may want a particular post to stand out from the rest of your articles, you may have a series of posts that you want to have a consistent layout within the series that is different from your standard posts, or you may have a need to display a certain post’s content differently than others because of what that content consists of, as was our case. Custom blog post templates can be assigned on a per-post basis, used once or multiple times, and you can also have as many different templates as you want.
Thankfully, the capability to create and use custom templates for blog posts is built right into WordPress, and is very similar to creating custom page templates. So let’s dive in and see how simple it can be!
How To Create Your Custom Blog Post Template
There are some differences you may encounter depending on the theme you’re using, but the basics are the same regardless. If you are not already using a child theme, you will need to create one, unless you are using a custom theme of some type, otherwise if you ever upgrade the parent theme you will lose the work you are doing here. Here’s a good article on how to create a child theme.
Once you have your child or custom theme, you will need to create a new file in the root of your theme (child or custom) folder, and name it whatever you want. In our case we named ours conferences.php. There is no required naming convention here – just use whatever will help you know what that file is for.
In your code editor, add the following code to your new file in the very beginning, replacing the template name with your desired name. The second line tells WordPress where this template will be used (on posts, not pages). The last line is just a comment for our own personal use, so you can delete or add your own comment as desired.
<?php

/* Template Name: Upcoming Conferences

* Template Post Type: post

*/

/* The template for annual upcoming conferences post. */

?>
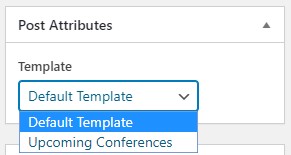
Once you save this file, you will see now see your new post template in the Template dropdown of the Post Attributes meta box on a post edit screen, as shown in the screenshot below.
The next step is to either copy over the contents of your theme’s single.php file into your new custom blog post template file and start editing and customizing as desired, or you can start from scratch (as we did) if your new layout is going to be radically different from your standard posts.
Voila! That’s It!
We’re not going to get into the coding of the whole template, as that will greatly vary depending on your requirements and the theme you’re using, but this simple little method will get you started on your way to creating your own custom blog post template in WordPress. Now you can go crazy creating all the customization you want! Have fun!
Cover photo courtesy of ShotStash.
This post may contain affiliate links. See our disclosure about affiliate links here.